龙心之火

Lxzh's Notes


  • 首页

  • 归档

  • 关于

  • guestbook

Build-mars-xlog-on-Windows

发表于 2024-06-11

一. 环境准备

安装 cmake 以及 python2.7, 以及下载 ndk-r16b,并配置环境变量 NDK_ROOT 指向 ndk 路径。

如果是 Windows 系统还需要安装 cygwin,并务必要安装其中的 make, gcc gdb。 然后把 cygwin 的 bin 目录配置到环境变量中的 PATH 中

1. 安装cmake

推荐直接使用 Android Studio 里的 SDK Manager 进行下载 cmake 安装,安装后配置环境变量即可

2. 安装python2.7

https://www.python.org/downloads/release/python-2716/下载后双击安装包进行安装

2.1 选择是否将Python.exe添加到系统Path环境变量

(也可以安装完成后手动在环境变量添加/删除Python.exe 路径)

2.2 安装后验证通过应该是这样:

3. 安装 cygwin

https://cygwin.com/install.html
3.1 下载后点击setup-x86_64.exe安装,出现安装画面。直接点“下一步”,出现安装模式的对话框,如下图所示:

我们看到有三种安装模式:

  • Install from Internet,这种模式直接从Internet安装,适合网速较快的情况;
  • Download Without Installing,这种模式只从网上下载Cygwin的组件包,但不安装;
  • Install from Local Directory,这种模式与上面第二种模式对应,当你的Cygwin组件包已经下载到本地,则可以使用此模式从本地安装Cygwin。

在这一步,需要注意,为了获得最快的下载速度,我们首先在列表中寻找Cygwin中国镜像的地址:http://www.cygwin.cn, 如果找到就选中这个地址;如果找不到这个地址,就选一个国内的镜像地址,推荐使用清华镜像 https://mirrors.tuna.tsinghua.edu.cn/cygwin/ (不推荐阿里云镜像 http://mirrors.aliyun.com/cygwin/, 实测下载内容速度极慢) 选择完成后,点击“下一步”,

这一步,我们选择需要下载安装的组件包,为了使我们安装的Cygwin能够编译xlog,需要安装

make
gcc
gdb

3.2 安装后验证
运行cygwin,在弹出的命令行窗口输入:
cygcheck -c cygwin
会打印出当前cygwin的版本和运行状态,如果status是ok的话,则cygwin运行正常。

然后依次输入gcc –version,g++ –version,make –version,gdb –version进行测试,如果都打印出版本信息和一些描述信息,非常高兴的告诉你,你的cygwin安装完成了!

3.2.1 在windows命令下使用cygwin

要想在Windows命令提示符下使用Cygwin,你需要添加Cygwin到Windows环境变量。
打开命令提示符来测试软件测试几个Linux命令。
正如下面的图片里所看到的,pwd和ls在Windows命令提示符工作正常

cygwin_win10.png
ndk-r16b
https://developer.android.com/ndk/downloads/older_releases.html?hl=zh-cn

解压android-ndk-r16b-windows-x86_64.zip
设置NDK_ROOT环境变量,在系统变量中增加。值如:”D:\android-ndk-r16b“;
把”%NDK_ROOT%“加入到系统变量Path中,记得分号隔开。
配置成功:

环境配置小结
到此环境准备成功了,接下来准备编译试试

编译xlog
所有的编译脚本都在mars/mars 目录, 运行编译脚本之前也必须cd到此目录,在当前目录下运行,默认是编译 armeabi 的,如果需要其他 CPU 架构,把编译脚本中的archs = set([‘armeabi’])稍作修改即可。

archs = set([‘armeabi’,’armeabi-v7a’,’x86’,’arm64-v8a’,’x86_64’])
开始编译

python build_android.py
执行命令后,会让选择:

Enter menu:
1. Clean && build mars.
2. Build incrementally mars.
3. Clean && build xlog.
4. Exit

如需要自定义日志加密算法或者长短连协议加解包,请选择static libs选项,即 2 和 3。选项 1 和 2 输出结果全部在 mars_android_sdk 目录中,3 和 4 输出结果全部在 mars_xlog_sdk 目录中。
结果:
Random-Generator.md

发表于 2021-05-26

1 0 0 1
2 0 1 0
3 0 1 1
4 1 0 0
5 1 0 1

0   0.6
  1 0.6
1   0.4
  0 0.4
0 0 0.24
1 1 0.24

0 1 0.36
1 0 0.36

Android中Java的异常处理机制

发表于 2019-11-22

Android中,Java虚拟机(JVM)是如何处理异常的呢?

在执行main函数的时候,如果运行过程中遇到异常问题,有两种情况:

  1. 通过try-catch捕获已知或者未知的异常将问题处理并跳过,然后继续运行,确保程序不会崩溃
  2. 但并非所有的异常都是可预知的,针对没有捕获到的异常,会一直向上抛,异常一旦被Thread.run()或主线程抛出后就不能在程序中对异常进行捕获,最终只能由JVM捕获由JVM来处理

JVM 有一个默认的异常处理机制,遇到异常,抛出异常,和打印异常信息,同时将程序停止运行,这就是我们看到的程序崩溃。

Java 的Thread类中有一个UncaughtExceptionHandler接口,该接口的作用主要是为了当Thread因未捕获的异常而突然终止时,调用处理程序处理异常。

1
2
3
4
5
6
7
8
//UncaughtExceptionHandler接口唯一的回调函数
void uncaughtException(Thread t, Throwable e);
//设置当前线程的异常处理器
Thread.setUncaughtExceptionHandler
//设置所有线程的默认异常处理器
Thread.setDefaultUncaughtExceptionHandler
//设置所有线程的默认异常预处理器
Thread.setUncaughtExceptionPreHandler

JVM 遇到线程未捕获的异常后,通过 Thread 的dispatchUncaughtException(e)方法分发异常到当前线程:

1
2
3
4
5
6
7
8
9
10
// art/runtime/thread.cc

void Thread::HandleUncaughtExceptions(ScopedObjectAccessAlreadyRunnable& soa) {
...
// Call the Thread instance's dispatchUncaughtException(Throwable)
tlsPtr_.jni_env->CallVoidMethod(peer.get(),
WellKnownClasses::java_lang_Thread_dispatchUncaughtException,
exception.get());
...
}

这个java_lang_Thread_dispatchUncaughtException方法就是 Thread 中的dispatchUncaughtException方法的缓存:

1
2
//art/runtime/well_known_classes.cc
java_lang_Thread_dispatchUncaughtException = CacheMethod(env, java_lang_Thread, false, "dispatchUncaughtException", "(Ljava/lang/Throwable;)V");

Thread 的dispatchUncaughtException方法如下:

1
2
3
4
5
6
7
8
9
10
11
12
public final void dispatchUncaughtException(Throwable e) {
Thread.UncaughtExceptionHandler initialUeh =
Thread.getUncaughtExceptionPreHandler();
if (initialUeh != null) {
try {
initialUeh.uncaughtException(this, e);
} catch (RuntimeException | Error ignored) {
// Throwables thrown by the initial handler are ignored
}
}
getUncaughtExceptionHandler().uncaughtException(this, e);
}

这里有 2 个UncaughtExceptionHandler会参与处理,分别是PreHandler和Handler,核心是执行其各自实现的uncaughtException方法。

Android 中提供了此二者的默认实现。Android 系统中,应用进程由Zygote进程孵化而来,Zygote进程启动时,zygoteInit方法中会调用RuntimeInit.commonInit,代码如下:

1
2
3
4
5
6
7
8
9
10
11
12
13
14
15
16
17
18
19
20
21
22
23
// frameworks/base/core/java/com/android/internal/os/ZygoteInit.java
/**
* The main function called when started through the zygote process...
*/
public static final Runnable zygoteInit(int targetSdkVersion, String[] argv, ClassLoader classLoader) {
// ...
RuntimeInit.commonInit();
ZygoteInit.nativeZygoteInit();
return RuntimeInit.applicationInit(targetSdkVersion, argv, classLoader);
}

// frameworks/base/core/java/com/android/internal/os/RuntimeInit.java
protected static final void commonInit() {
...
/*
* set handlers; these apply to all threads in the VM. Apps can replace
* the default handler, but not the pre handler.
*/
LoggingHandler loggingHandler = new LoggingHandler();
Thread.setUncaughtExceptionPreHandler(loggingHandler);
Thread.setDefaultUncaughtExceptionHandler(new KillApplicationHandler(loggingHandler));
...
}

在commonInit方法中实例化了 2 个对象,分别是LoggingHandler和KillApplicationHandler,均实现了Thread.UncaughtExceptionHandler接口。其中:

  1. LoggingHandler负责打印异常信息,包括进程名,pid,Java栈信息等
  • 系统进程,日志以"*** FATAL EXCEPTION IN SYSTEM PROCESS: "开头
  • 应用进程,日志以"FATAL EXCEPTION: "开头
  1. KillApplicationHandler检查日志是否已打印,通知 AMS 应用 Crash,并杀死当前进程。

注意1:

  • Android N 及之前版本,只有一个UncaughtHandler类
  • Android O 及之后版本,进行了功能拆分,拆为LoggingHandler和KillApplicationHandler,回调方法uncaughtException实现如下:
1
2
3
4
5
6
7
8
9
10
11
12
13
14
15
public void uncaughtException(Thread t, Throwable e) {
try {
ensureLogging(t, e);
...
// Bring up crash dialog, wait for it to be dismissed
ActivityManager.getService().handleApplicationCrash(
mApplicationObject, new ApplicationErrorReport.ParcelableCrashInfo(e));
} catch (Throwable t2) {
...
} finally {
// Try everything to make sure this process goes away.
Process.killProcess(Process.myPid());
System.exit(10);
}
}

注意2:

  • Thread.setDefaultUncaughtExceptionHandler是公开 API。应用可通过调用自定义UncaughtExceptionHandler,替换掉KillApplicationHandler,这样能自定义逻辑处理掉异常,避免闪退发生

  • Thread.setUncaughtExceptionPreHandler是 hidden API。应用不能直接调用,确保异常发生时能够正常打印异常日志,参考Thread.java的更新日志:

1
Add a new @hide API to set an additional UncaughtExceptionHandler that is called before dispatching to the regular handler. The framework uses this to enforce logging.

Android O 及以后版本,对于任何一个线程异常,会优先经过getUncaughtExceptionPreHandler方法获取异常预处理器处理, 然后通过getUncaughtExceptionHandler方法获取当前线程实例的异常处理器处理异常。

Thread 的getUncaughtExceptionHandler方法:

1
2
3
4
public UncaughtExceptionHandler getUncaughtExceptionHandler() {
return uncaughtExceptionHandler != null ?
uncaughtExceptionHandler : group;
}

如果当前线程没有设置异常处理器,会选择当前线程所在的ThreadGroup(ThreadGroup 是一个Thread 的集合,自己实现了UncaughtExceptionHandler接口)来处理异常:

1
2
3
4
5
6
7
8
9
10
11
12
13
public void uncaughtException(Thread t, Throwable e) {
if (parent != null) {
parent.uncaughtException(t, e);
} else {
Thread.UncaughtExceptionHandler ueh = Thread.getDefaultUncaughtExceptionHandler();
if (ueh != null) {
ueh.uncaughtException(t, e);
} else if (!(e instanceof ThreadDeath)) {
System.err.print("Exception in thread \"" + t.getName() + "\" ");
e.printStackTrace(System.err);
}
}
}

在ThreadGroup的uncaughtException回调中会通过getDefaultUncaughtExceptionHandler接口获取默认的线程异常处理器进行最后的异常处理。

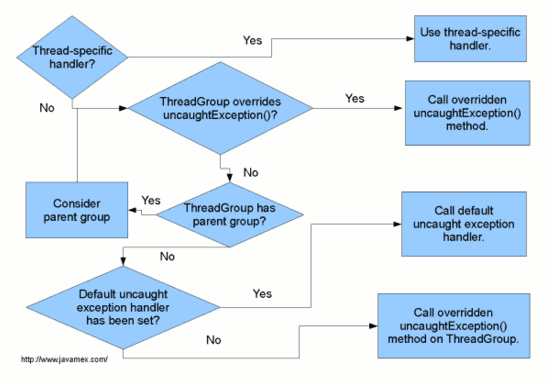
综上所述,当JVM遇到未捕获的异常时:

  1. 首先经所有线程共有的异常预处理器处理
  2. 线程共有异常预处理器预处理后交给当前线程的异常处理器处理
  3. 如果当前线程没有设置异常处理器,就转交给线程所在的线程组ThreadGroup来处理
  4. 线程组委托给父线程组处理,依次向上委托
  5. 最后在根线程组中获取线程共有的默认异常处理器来处理异常

以上流程总结如下图所示:

注意:

Android 中如果我们仅仅通过setDefaultUncaughtExceptionHandler方法覆盖默认的异常处理器,在回调中收集异常信息时,一定要注意记得杀死当前进程(让它痛快的死去):

1
2
Process.killProcess(Process.myPid());
System.exit(10);

不然应用就会陷入卡死状态,无法响应界面操作,进入了生不如死的状态。

附:Java中出现 Crash 在 JVM 中的响应机制

通过上面的分析,我们知道出现 Crash 时,JVM 是通过Thread::HandleUncaughtExceptions方法将异常从Native 层传递到Java 层来逐层分发处理。

那么HandleUncaughtExceptions方法这个方法到底是在哪里调用的呢?搜索整个 Android 源码,我们只能找到一处调用,也即:

1
2
3
4
5
6
7
8
9
10
11
void Thread::Destroy() {
Thread* self = this;
DCHECK_EQ(self, Thread::Current());
...
if (tlsPtr_.opeer != nullptr) {
ScopedObjectAccess soa(self);
// We may need to call user-supplied managed code, do this before final clean-up.
HandleUncaughtExceptions(soa);
RemoveFromThreadGroup(soa);
}
}

这个Destroy()又是在什么时候调用呢?

通过搜索自然能够找到,如下图所示:

但不够直观理解。这里有一份 Crash 后打印的 Native 层堆栈信息(这个堆栈信息平时应该比较常见):

1
2
3
4
5
6
#23  pc 0000000000389c19  /system/lib/libart.so (art::Thread::HandleUncaughtExceptions(art::ScopedObjectAccessAlreadyRunnable&)+280)
#24 pc 0000000000389275 /system/lib/libart.so (art::Thread::Destroy()+1128)
#25 pc 00000000003982b1 /system/lib/libart.so (art::ThreadList::Unregister(art::Thread*)+104)
#26 pc 000000000037f209 /system/lib/libart.so (art::Thread::CreateCallback(void*)+1612)
#27 pc 0000000000048811 /system/lib/libc.so (__pthread_start(void*)+24)
#28 pc 000000000001b369 /system/lib/libc.so (__start_thread+32)

其中art::Thread::CreateCallback方法如下:

1
2
3
4
5
6
7
8
9
10
11
12
13
14
15
16
17
18
19
20
21
22
23
24
25
void* Thread::CreateCallback(void* arg) {
Thread* self = reinterpret_cast<Thread*>(arg);
Runtime* runtime = Runtime::Current();
if (runtime == nullptr) {
LOG(ERROR) << "Thread attaching to non-existent runtime: " << *self;
return nullptr;
}
//...
{
ScopedObjectAccess soa(self);
self->InitStringEntryPoints();
//...
runtime->GetRuntimeCallbacks()->ThreadStart(self);

// Invoke the 'run' method of our java.lang.Thread.
ObjPtr<mirror::Object> receiver = self->tlsPtr_.opeer;
jmethodID mid = WellKnownClasses::java_lang_Thread_run;
ScopedLocalRef<jobject> ref(soa.Env(), soa.AddLocalReference<jobject>(receiver));
InvokeVirtualOrInterfaceWithJValues(soa, ref.get(), mid, nullptr);
}
// Detach and delete self.
Runtime::Current()->GetThreadList()->Unregister(self);

return nullptr;
}

Android Java 中的Thread类通过 start 启动一个线程时,会通过一个 native 函数nativeCreate进入 jni 层完成真正的线程创建:

1
2
3
4
5
6
7
8
9
10
11
public synchronized void start() {
...
try {
// Android-changed: Use Android specific nativeCreate() method to create/start thread.
// start0();
nativeCreate(this, stackSize, daemon);
started = true;
} finally {
...
}
}

这个nativeCreate方法接着会调用到art::Thread::CreateNativeThread方法:

1
2
3
4
5
6
7
8
9
10
11
12
13
14
// art/runtime/native/java_lang_Thread.cc
static void Thread_nativeCreate(JNIEnv* env, jclass, jobject java_thread, jlong stack_size,
jboolean daemon) {
// There are sections in the zygote that forbid thread creation.
Runtime* runtime = Runtime::Current();
if (runtime->IsZygote() && runtime->IsZygoteNoThreadSection()) {
jclass internal_error = env->FindClass("java/lang/InternalError");
CHECK(internal_error != nullptr);
env->ThrowNew(internal_error, "Cannot create threads in zygote");
return;
}

Thread::CreateNativeThread(env, java_thread, stack_size, daemon == JNI_TRUE);
}

JVM 在art::Thread::CreateNativeThread方法中通过pthread_create创建 Native 层的线程,并回调CreateCallback接口。

1
2
3
4
5
6
7
8
void Thread::CreateNativeThread(JNIEnv* env, jobject java_peer, size_t stack_size, bool is_daemon) {
...
pthread_create_result = pthread_create(&new_pthread,
&attr,
Thread::CreateCallback,
child_thread);
...
}

CreateCallback接口中有一段{}括起来的代码块中调用了 Java 层Thread的run方法,进入 java 层Thread的线程循环。

1
2
3
4
5
6
7
8
9
10
11
12
void* Thread::CreateCallback(void* arg) {
...
{
...
// Invoke the 'run' method of our java.lang.Thread.
ObjPtr<mirror::Object> receiver = self->tlsPtr_.opeer;
jmethodID mid = WellKnownClasses::java_lang_Thread_run;
ScopedLocalRef<jobject> ref(soa.Env(), soa.AddLocalReference<jobject>(receiver));
InvokeVirtualOrInterfaceWithJValues(soa, ref.get(), mid, nullptr);
}
...
}

正常情况下对于主线程而言这里的run方法里会进入死循环,也就是当前的主线程ActivityThread的 main 函数中的Loop.loop()。

一旦主线程中出现未捕获的异常,就会跳出主线程循环,从而离开这里的代码块,回调art::ThreadList::Unregister方法,然后调用art::Thread::Destroy方法,最后通过HandleUncaughtExceptions方法分发异常, 这也正好与上文中的异常堆栈吻合。


现在又问题来了,为什么出现异常就会退出这个线程循环呢?

这个问题要从 Java 的字节码指令执行上说起,首先我们举个简单的例子,crash()方法中触发一个简单的除零异常:

1
2
3
4
5
public class Crash {
public static void crash() {
int i = 10/0;
}
}

其中crash方法的smali代码如下:

1
2
3
4
5
6
7
8
9
10
11
12
.method public static crash()V
.registers 1

.line 5
const/16 v0, 0xa

div-int/lit8 v0, v0, 0x0

.line 6
.local v0, "i":I
return-void
.end method

关于 Java 代码在dalvik与art中的执行,这里暂不详细展开。这个除法操作编译后转换为了一条div-int指令,当虚拟机需要执行这个语句时,首先会去解释这个语句,通过字符串匹配的形式找到对应的指令代码,这条语句对应DIV_INT_LIT8方法

1
2
3
4
5
6
7
8
9
10
11
12
13
14
15
16
17
18
//art/libdexfile/dex/dex_instruction_list.h
...
V(0xD3, DIV_INT_LIT16, "div-int/lit16", k22s, kIndexNone, kContinue | kThrow, kDivide | kRegCFieldOrConstant, kVerifyRegA | kVerifyRegB) \
V(0xD4, REM_INT_LIT16, "rem-int/lit16", k22s, kIndexNone, kContinue | kThrow, kRemainder | kRegCFieldOrConstant, kVerifyRegA | kVerifyRegB) \
V(0xD5, AND_INT_LIT16, "and-int/lit16", k22s, kIndexNone, kContinue, kAnd | kRegCFieldOrConstant, kVerifyRegA | kVerifyRegB) \
V(0xD6, OR_INT_LIT16, "or-int/lit16", k22s, kIndexNone, kContinue, kOr | kRegCFieldOrConstant, kVerifyRegA | kVerifyRegB) \
V(0xD7, XOR_INT_LIT16, "xor-int/lit16", k22s, kIndexNone, kContinue, kXor | kRegCFieldOrConstant, kVerifyRegA | kVerifyRegB) \
V(0xD8, ADD_INT_LIT8, "add-int/lit8", k22b, kIndexNone, kContinue, kAdd | kRegCFieldOrConstant, kVerifyRegA | kVerifyRegB) \
V(0xD9, RSUB_INT_LIT8, "rsub-int/lit8", k22b, kIndexNone, kContinue, kSubtract | kRegCFieldOrConstant, kVerifyRegA | kVerifyRegB) \
V(0xDA, MUL_INT_LIT8, "mul-int/lit8", k22b, kIndexNone, kContinue, kMultiply | kRegCFieldOrConstant, kVerifyRegA | kVerifyRegB) \
V(0xDB, DIV_INT_LIT8, "div-int/lit8", k22b, kIndexNone, kContinue | kThrow, kDivide | kRegCFieldOrConstant, kVerifyRegA | kVerifyRegB) \
V(0xDC, REM_INT_LIT8, "rem-int/lit8", k22b, kIndexNone, kContinue | kThrow, kRemainder | kRegCFieldOrConstant, kVerifyRegA | kVerifyRegB) \
V(0xDD, AND_INT_LIT8, "and-int/lit8", k22b, kIndexNone, kContinue, kAnd | kRegCFieldOrConstant, kVerifyRegA | kVerifyRegB) \
V(0xDE, OR_INT_LIT8, "or-int/lit8", k22b, kIndexNone, kContinue, kOr | kRegCFieldOrConstant, kVerifyRegA | kVerifyRegB) \
V(0xDF, XOR_INT_LIT8, "xor-int/lit8", k22b, kIndexNone, kContinue, kXor | kRegCFieldOrConstant, kVerifyRegA | kVerifyRegB) \
V(0xE0, SHL_INT_LIT8, "shl-int/lit8", k22b, kIndexNone, kContinue, kShl | kRegCFieldOrConstant, kVerifyRegA | kVerifyRegB) \
V(0xE1, SHR_INT_LIT8, "shr-int/lit8", k22b, kIndexNone, kContinue, kShr | kRegCFieldOrConstant, kVerifyRegA | kVerifyRegB) \
...

DIV_INT_LIT8方法继而调用DoIntDivide方法:

1
2
3
4
5
6
7
// art/runtime/interpreter/interpreter_switch_impl-inl.h

ALWAYS_INLINE void DIV_INT_LIT8() REQUIRES_SHARED(Locks::mutator_lock_) {
bool success = DoIntDivide(shadow_frame, inst->VRegA_22b(inst_data),
shadow_frame.GetVReg(inst->VRegB_22b()), inst->VRegC_22b());
POSSIBLY_HANDLE_PENDING_EXCEPTION(!success, Next_2xx);
}

DoIntDivide方法定义如下:

1
2
3
4
5
6
7
8
9
10
11
12
13
// art/runtime/interpreter/interpreter_common.h
// Handles div-int, div-int/2addr, div-int/li16 and div-int/lit8 instructions.
// Returns true on success, otherwise throws a java.lang.ArithmeticException and return false.
static inline bool DoIntDivide(ShadowFrame& shadow_frame, size_t result_reg,
int32_t dividend, int32_t divisor)
REQUIRES_SHARED(Locks::mutator_lock_) {
constexpr int32_t kMinInt = std::numeric_limits<int32_t>::min();
if (UNLIKELY(divisor == 0)) {
ThrowArithmeticExceptionDivideByZero();
return false;
}
...
}

这里我们可以看到当被除数divisor等于0时,就通过ThrowArithmeticExceptionDivideByZero方法抛出除零异常,继续跟踪:

1
2
3
4
// art/runtime/common_throws.cc
ThrowArithmeticExceptionDivideByZero() -> ThrowException() ->
// art/runtime/thread.cc
Thread::Current()-> ThrowNewException(exception_descriptor, nullptr) -> ThrowNewWrappedException(exception_class_descriptor, msg) ->

进入art::Thread::ThrowNewWrappedException方法后,会进行一大堆操作,包括获取当前线程的堆栈,最后赋值给tlsPtr这个大的结构体的exception。

也就是说当虚拟机一步一步执行 Java 指令的时候,当遇到类似除零这种异常操作时,就会抛出一个对应的异常,然后一步一步返回到当前执行的地方,将异常入栈,跳出当前指令循环(可能解释得不是很清楚,参考这里),也就是结束了 Java 层的线程循环,回到art::Thread::CreateCallback回调中,从而进行接下来的异常分发流程。也就是说并不是虚拟机遇到未知运算或者未知指令出现了不可预期的异常,而是知道这个操作不符合规范,给不了有效的结果,主动抛出来一个异常给应用层。

如何查看Gradle插件的源码

发表于 2019-11-08

在进行自定义Gradle插件开发的过程中,除了查阅官方文档,在网上搜索开源插件源码以外,还有一种方式可以获取到一些公开的插件的源码。

首先我们平时通过apply plugin: 'com.android.application'引用的android这个插件的源码我们可以从aosp代码仓库里面找到,传送门(这里给的是android-10.0.0_r11的,历史版本可以自行查找,需要fan qiang)

比如下面firebase用到的google-service插件也可以从aosp中传送门找到

apply plugin: 'com.google.gms.google-services'

接着就是一些商用或者非商用sdk使用到的gradle插件了,往往我们比较好奇这个插件里面到底干了啥,或者刚好它有个好用的功能我也想借鉴一下,那么看其源码肯定是最直接好用的办法。

阅读全文 »

简单三步查看你浏览器保存的登录帐号密码

发表于 2018-07-25

问题复现

1. 在需要登录的网页上选择浏览器自动保存的账号,如简书:

简书登录

阅读全文 »

排序算法——汇总

发表于 2018-07-24

  本文集中汇总冒泡、插入(对半插入)、选择、希尔、堆排序、归并、快速、七种排序算法,收集了网上的示意图、动图进行生动的展示。

阅读全文 »

普通用户借助docker容器提权

发表于 2018-04-18

阅读本文需要对docker有一定的了解,以及会一些基本的使用。

随着docker越来越流行,很多公司内部linux机器上docker成了标配。

免sudo使用docker

默认情况下使用docker必须要有sudo权限,对于一台机器多用户使用,往往很多用户只有普通权限,如何保证普通用户也能顺利使用Docker呢?

这一点想必难不到大家,只需要管理员将需要使用docker的用户添加到docker用户组(安装docker后默认会创建该组)中,用户重新登录机器即可免sudo使用docker了。

阅读全文 »

优雅的过滤广告

发表于 2018-03-30

[TOC]

广告过滤

最近在浏览网页的时候,感觉有些网站的广告真的很烦,一不好看影响视觉,二总在切图吸引注意力,三有些广告有点少儿不宜,于是琢磨该如何过滤广告呢?

起初这个想法源自于公司办公的时候。由于公司访问外网必须要配置代理,而在配置代理的地方有个高级设置,里面可以通过精确/模糊匹配的方式过滤一些网址,本来这个功能平时一直用于过滤公司内部的一些服务器或内部网址等,避免也走代理导致无法访问。

阅读全文 »

CVE-2017-16995

发表于 2018-03-21

Ubuntu本地提权初探

漏洞描述

该漏洞存在于带有 eBPF bpf(2)系统(CONFIG_BPF_SYSCALL)编译支持的Linux内核中,是一个内存任意读写漏洞。该漏洞是由于eBPF验证模块的计算错误产生的。普通用户可以构造特殊的BPF来触发该漏洞,此外恶意攻击者也可以使用该漏洞来进行本地提权操作。

阅读全文 »

Half Precision float

发表于 2017-12-09

Half-precision floating-point format

bit15:         1 bit SIGN      +---+-------+--------------+
bit14-10:      5 bit EXP       | S | EEEEE | MM MMMM MMMM |
bit0-9:       10 bit MAN       +---+-------+--------------+

参考 IEEE754-2008 WIKIPEDIA:Half-precision floating-point format

Hall-precision floating-point number 半精度浮点数,文中简称fp16

1.计算公式

Denormal number:

E=00000 $ y=(-1)^S\times \frac{M}{2^{10}} \times 2^{-14}$

Normal number:

E=00001~11110 $y=(-1)^S\times(1+\frac{M}{2^{10}}) \times 2^{E-15}$

Inf:Infinity

E=11111 M=00000 00000

NaN: Not a number

E=11111 M>0

阅读全文 »

Hexo博客正文嵌入QQ表情

发表于 2017-02-18

     在迁移以前CSDN的文章到Hexo时,发现CSDN文章一个比较好玩的东东就是可以在内容中加入QQ表情,于是想弄到Hexo里面。

方案一

     一开始想到的做法是把QQ表情下载下来,上传到七牛,然后用Markdown插入图片功能插入图片。

阅读全文 »

ShellCmd

发表于 2017-01-08

Mac shell小技巧

COUNT=0;dir=$(eval pwd); for name in $(ls $dir);do COUNT=$(($COUNT+1));param=$(eval printf "%03d" $COUNT);mv $name frame$param.png; done

将当前目录下所有图片文件按顺序格式化递增序号重命名
输出文件格式:xxx%03d.png
说明:
$(eval pwd):获取当前目录
for name in $(ls $dir):遍历当前目录下所以文件
COUNT=$(($COUNT+1)):计数器+1
param=$(eval printf "%03d" $COUNT):计数器三位前向补零格式化
mv $name frame$param.png:文件重命名

Compile And Install FFmpeg

发表于 2017-01-08

(The original link)

STEP 1 - Preparations

Install Xcode(include git)

STEP 2 - Downloading all necessary source codes

Download all file into a folder named FFmpeg on the your disk:

1、FFmpeg source code

  • Open the Terminal
  • write the following in the Terminal : git clone git://git.videolan.org/ffmpeg.git ffmpeg
    Because FFmpeg needs several extra codecs you need some other source codes too.

2、MP3lame source code

  • Go to http://lame.sourceforge.net/download.php
  • Download lame source
阅读全文 »

Hello World

发表于 2016-01-01

Welcome to Hexo! This is your very first post. Check documentation for more info. If you get any problems when using Hexo, you can find the answer in troubleshooting or you can ask me on GitHub.

Quick Start

Create a new post

1
$ hexo new "My New Post"

More info: Writing

Run server

1
$ hexo server

More info: Server

Generate static files

1
2
$ hexo generate
$ hexo g

More info: Generating

Deploy to remote sites

1
2
$ hexo deploy
$ hexo d

More info: Deployment

排序算法进阶(一)——快速排序算法(基本类型与复杂类型)

发表于 2015-08-01

      一个好的算法,不仅要高效的解决实际问题,还要以代码简介、冗余少为荣!

      排序算法进阶(一)中介绍了快速排序算法,但_它只适用于int类型的数组_,当我们实际使用中往往会设计到多种数据类型,如浮点类型、字符串类型,难道需要再为这些类型重写一个除了类型以外其他都一样的方法吗?

      不用,java的泛型类型给了我们这个便利。像我们平时经常用的List、Map、Vector,它的内部实现并不会对每一种数据类型进行适配,因为它们都使用了泛型。

阅读全文 »

排序算法进阶(一)——快速排序算法

发表于 2015-08-01

      偶然间看了一篇微信上的文章,CSDN链接,里面介绍了十大算法,分别是:

一:快速排序算法
二:堆排序算法
三:归并排序
四:二分查找算法
五:BFPRT(线性查找算法)
六:DFS(深度优先搜索)
七:BFS(广度优先搜索)
八:Dijkstra算法
九:动态规划算法
十:朴素贝叶斯分类算法

阅读全文 »

Csharp PPT Operator

发表于 2015-07-24
1
2
3
4
5
6
7
8
9
10
11
12
13
14
15
16
17
18
19
20
21
22
23
24
25
26
27
28
29
30
31
32
33
34
35
36
37
38
39
40
41
42
43
44
45
46
47
48
49
50
51
52
53
54
55
56
57
58
59
60
61
62
63
64
65
66
67
68
69
70
71
72
73
74
75
76
77
78
79
80
81
82
83
84
85
86
87
88
89
90
91
92
93
94
95
96
97
98
99
100
101
102
103
104
105
106
107
108
109
110
111
112
113
114
115
116
117
118
119
120
121
122
123
124
125
126
127
128
129
130
131
132
133
134
135
136
137
138
139
140
141
142
143
144
145
146
147
148
149
150
151
152
153
154
155
156
157
158
159
160
161
162
163
164
165
166
167
168
169
170
171
172
173
174
175
176
177
178
179
180
181
182
183
184
185
186
187
188
189
190
191
192
using System;
using System.Collections.Generic;
using System.Linq;
using System.Text;
using Microsoft.Office.Core;
using PPT = Microsoft.Office.Interop.PowerPoint;
using System.Windows;
using System.Collections;
using System.Windows.Forms;
using System.IO;
using System.Reflection;
using Tools.functionModel.file;
using System.Drawing;
using System.Drawing.Imaging;
//using System.Windows.Controls;

namespace Tools.baseModel.common {
/// <summary>
/// PPT文档操作实现类.
/// </summary>
public class pptBase {
private string temPath = "";
private string pptPath = "";
#region=========基本的参数信息=======
PPT.Application pptApp; //PPT应用程序变量

public PPT.Application PptApp {
get { return pptApp; }
set { pptApp = value; }
}
PPT.Presentation pptDoc; //PPT文档变量
PPT.Slides pptSlides = null;
PPT.Slide pptSlide = null;
private int pageCount=0;
#endregion

public PPT.Shapes Shapes {
get { return pptSlide.Shapes; }
}


public pptBase(string path) {
this.temPath = commonPath.fiberFolder + "/other/template.pot";
this.pptPath = path;
//如果已存在,则删除
if (File.Exists((string)pptPath)) {
File.Delete((string)pptPath);
}
FileInfo file = new FileInfo(this.temPath);
pptApp = new PPT.Application(); //初始化
pptApp.Visible = MsoTriState.msoTrue;
pptDoc = pptApp.Presentations.Open(file.FullName, MsoTriState.msoFalse, MsoTriState.msoTrue, MsoTriState.msoTrue);
pptSlides = pptDoc.Slides;
//pptDoc = pptApp.Presentations.Add(Microsoft.Office.Core.MsoTriState.msoFalse);
}

public void AddPage() {
pageCount++;
//pptDoc.Slides.Add(pageCount, PPT.PpSlideLayout.ppLayoutText);
pptSlide = pptSlides.Add(pageCount, PPT.PpSlideLayout.ppLayoutTitleOnly);
}

public void InsertPage(int index) {
PPT.CustomLayout ppLayout = pptSlide.CustomLayout;
pptSlide = pptSlides.AddSlide(index, ppLayout);
pageCount++;
}


#region 添加文本框
public PPT.Shape drawText(PPT.Shapes shapes, pptText textBox) {
PPT.Shape shape = null;
if (textBox == null || textBox.Location.IsEmpty || textBox.FrameSize.IsEmpty)
return shape;
shape = shapes.AddTextbox(textBox.Orientation, textBox.X, textBox.Y, textBox.Width, textBox.Height);
shape.TextFrame.HorizontalAnchor = textBox.HorizontalAnchor;
shape.TextFrame.VerticalAnchor = textBox.VerticalAnchor;
shape.TextFrame.TextRange.Font.Color.RGB = colorFormat(textBox.ForeColor);
shape.TextFrame.TextRange.Font.Bold = textBox.Font.Bold ? MsoTriState.msoTrue : MsoTriState.msoFalse;
shape.TextFrame.TextRange.Font.Italic = textBox.Font.Italic ? MsoTriState.msoTrue : MsoTriState.msoFalse;
shape.TextFrame.TextRange.Font.Underline = textBox.Font.Underline ? MsoTriState.msoTrue : MsoTriState.msoFalse;
shape.TextFrame.TextRange.Font.Size = textBox.Font.Size;
shape.TextFrame.TextRange.Font.Name = textBox.Font.Name;
shape.TextFrame.MarginLeft = 0;
shape.TextFrame.MarginRight = 0;
if (textBox.BackColor == Color.Transparent) {
shape.Fill.Visible = Microsoft.Office.Core.MsoTriState.msoFalse;
} else {
shape.Fill.BackColor.RGB = colorFormat(textBox.BackColor);
}
shape.Line.Weight = textBox.BoardWeight;
if (textBox.BoardColor == Color.Transparent) {
shape.Line.Visible = Microsoft.Office.Core.MsoTriState.msoFalse;
} else {
shape.Line.BackColor.RGB = colorFormat(textBox.BoardColor);
}
shape.Line.DashStyle = textBox.BoardStyle;
shape.TextFrame.TextRange.Text = textBox.Text;
return shape;
}
#endregion

#region 添加基本图形
//画直线
public PPT.Shape drawLine(PPT.Shapes shapes, float beginX, float beginY, float endX, float endY) {
PPT.Shape shape = shapes.AddLine(beginX, beginY, endX, endY);
return shape;
}
//画直线
public PPT.Shape drawLine(PPT.Shapes shapes, float beginX, float beginY, float endX, float endY, float weight, Color foreColor) {
PPT.Shape shape = shapes.AddLine(beginX, beginY, endX, endY);
shape.Line.ForeColor.RGB = colorFormat(foreColor); //线条颜色
shape.Line.Weight = weight; //线条粗细
return shape;
}
//画矩形
public PPT.Shape drawRectangle(PPT.Shapes shapes, float beginX, float beginY, float width, float height) {
PPT.Shape shape = shapes.AddShape(MsoAutoShapeType.msoShapeRectangle, beginX, beginY, width, height);
return shape;
}
//画矩形
public PPT.Shape drawRectangle(PPT.Shapes shapes, float beginX, float beginY, float width, float height, float weight, Color foreColor, Color backColor) {
PPT.Shape shape = shapes.AddShape(MsoAutoShapeType.msoShapeRectangle, beginX, beginY, width, height);
shape.Line.ForeColor.RGB = colorFormat(foreColor); //线条颜色
shape.Fill.BackColor.RGB = colorFormat(backColor); //填充颜色
shape.Line.Weight = weight; //线条粗细
return shape;
}
//画箭头
public PPT.Shape drawArrow(PPT.Shapes shapes, float beginX, float beginY, float endX, float endY,float weight) {
float width=(float)Math.Sqrt(Math.Pow(endX-beginX,2)+Math.Pow(endY-beginY,2));
float startX = (beginX + endX) / 2-width/2;
float startY = (beginY + endY) / 2;
float angle = endX==beginX?(endY>beginY?90:-90):(float)Math.Atan((endY – beginY) / (endX – beginX));
angle = (float)(angle / Math.PI * 180.0);
angle = angle < 0 ? 180.0f + angle : angle;
PPT.Shape shape = shapes.AddShape(MsoAutoShapeType.msoShapeRightArrow, startX, startY, width, weight);
shape.Rotation = angle;
return shape;
}
//画箭头
public PPT.Shape drawRightArrow(PPT.Shapes shapes, float beginX, float beginY, float endX, float endY, float weight, Color foreColor, Color backColor) {
PPT.Shape shape = drawArrow(shapes, beginX, beginY, endX, endY, weight);
shape.Line.ForeColor.RGB = colorFormat(foreColor); //线条颜色
shape.Fill.BackColor.RGB = colorFormat(backColor); //填充颜色
return shape;
}
#endregion

#region 添加图片
public PPT.Shape AddPicture(PPT.Shapes shapes, string picPath, float beginX, float beginY, float width, float height) {
PPT.Shape shape = null;
if (!File.Exists(picPath)) {
throw new Exception("图片文件不存在!");
} else {
shape = shapes.AddPicture(picPath, MsoTriState.msoFalse, MsoTriState.msoTrue, beginX, beginY, width, height);
}
return shape;
}
public PPT.Shape AddPicture(PPT.Shapes shapes, Bitmap bitmap, float beginX, float beginY, float width, float height) {
PPT.Shape shape = null;
string picPath=System.IO.Path.GetTempPath()+"bitmap.bmp";
bitmap.Save(picPath, ImageFormat.Bmp);
shape = shapes.AddPicture(picPath, MsoTriState.msoFalse, MsoTriState.msoTrue, beginX, beginY, width, height);
return shape;
}
#endregion

public void Close() {
try {
//WdSaveFormat为PPT文档的保存格式
PPT.PpSaveAsFileType format = PPT.PpSaveAsFileType.ppSaveAsDefault;
//将pptDoc文档对象的内容保存为PPT文档
pptDoc.SaveAs(pptPath, format, Microsoft.Office.Core.MsoTriState.msoFalse);

//关闭pptDoc文档对象
pptDoc.Close();
//关闭pptApp组件对象
pptApp.Quit();
} catch (Exception ex) {
outPrint.appendText("保存或关闭PPT出错,错误信息:" + ex.Message);
}
}
/// <summary>
/// 系统颜色转换为PPT支持的颜色值
/// </summary>
private int colorFormat(System.Drawing.Color color) {
int value = ((color.B * 256 + color.G) * 256) + color.R;//Office RGB与 System.Drawing.Color.RGB顺序相反
return value;
}
}
}

Extjs导出excel数据

发表于 2015-04-18

环境:前台:Extjs;后台hibernate+struct

需求:前台查询结果分页显示,导出到excel时需要导出所有符合查询条件的记录。

阅读全文 »

查找算法

发表于 2014-04-19

      本文集中了两种查找算法:顺序查找算法与二分查找算法,其中二分查找算法又有两种实现方式,分别为递归查找与迭代查找。

阅读全文 »

基础排序算法——汇总

发表于 2014-04-19

      本文集中汇总冒泡排序、插入排序、对半插入排序三种算法,并分别用C++、C#、Java三种语言实现。

阅读全文 »
12
lxzh

lxzh

23 日志
12 标签
RSS
GitHub Weibo
Links
  • Lxzh123
© 2024 lxzh
由 Hexo 强力驱动
|
主题 — NexT.Mist v5.1.4